Isometric Games Sprite Masking Technique
By Richard Jordan - 29th February 2008
This article explains how to draw a none tiled scene in an isometric game without having to rely on a drawing order for the objects in the scene. In fact, it eliminates the need for a drawing order altogether. It allows for easy and flexible positioning of objects without having to adhere to an isometric tile grid.
It's important to consider the following:
- The primary objective of this article is to explain why the drawing order technique will not work if you want to draw cuboid blocks of any size in any location in 3D space.
- The technique cannot cope with two blocks overlapping each other, they must not invade each others space.
- There are probably other ways to achieve the same thing, this is just one example.
Figure 1 quickly and clearly illustrates the shortcomings of trying to use a drawing order. Look closely at the desired render and you'll see that each of the three blocks is in some way obscured by one of the other blocks. The red block sits further away than the blue block, the blue block is underneath the green block and the red block is in front of the green block. There is no optical illusion trick here, each block is in a valid position.
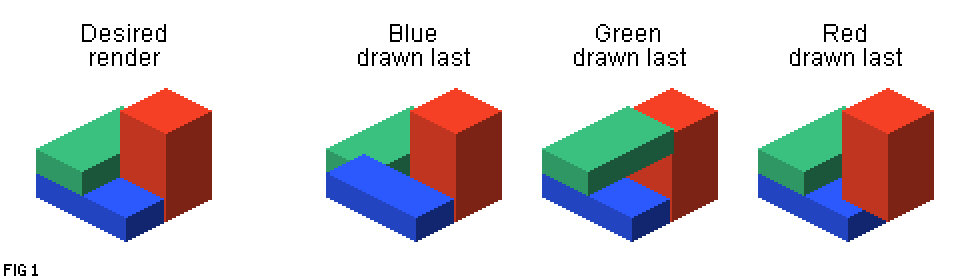
A drawing order could never work for this situation. Which block would you draw last? Whichever block it is, it would be fully drawn and therefore the scene would not be rendered correctly. So if the drawing order technique will not work then what will? The answer to the problem is masking, let's take a closer look.
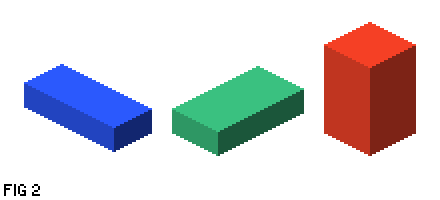
Figure 2 shows the three blocks being drawn in the scene. There's nothing special about them and they don't have to be the size shown in the diagram. The masking technique will work with blocks of any size.
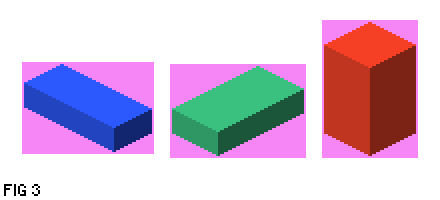
Traditional isometric games work within a 2D graphics environment so each of the blocks is stored as a 2D sprite. Figure 3 shows what the size of the three sprites might be. The height and width of each sprite is not important, they can be padded out with more transparent space around the visible part of the graphic but that's inefficient. It will mean having to process extra pixels. The pink area indicates transparency.
Time to get down to the nitty gritty!
To render the scene, the game logic needs to loop around each sprite and process it against every other sprite. The following steps explain the processing required. Let's assume that the current iteration of the loop is comparing the red block against the green block.
Step One
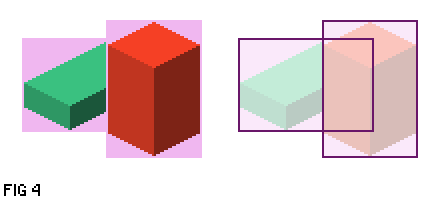
Check to see if the bounds of the green sprite and the red sprite overlap each other. If they don't then no further processing is required for this iteration of the loop because the two blocks could not possibly be obscuring each other, they are too far apart. In our example, they do intersect, as shown in figure 4, so onto the next step.
Step Two
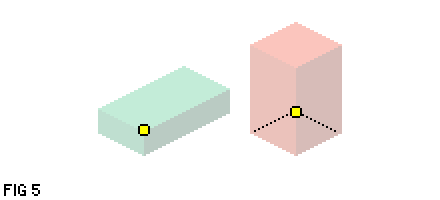
The next thing to do is determine which of the two blocks is closest to the viewer. This is done by selecting the furthest vertex of the primary block (ie. the block currently being compared against every other, in this case red) and the nearest vertex of the other block. Figure 5 shows which vertices to use for our two blocks.
To determine the closer of the two vertices, think of an imaginary area extending out behind the green block, starting at the selected vertex and extending back into infinity. Figure 6 shows this area behind the green block.
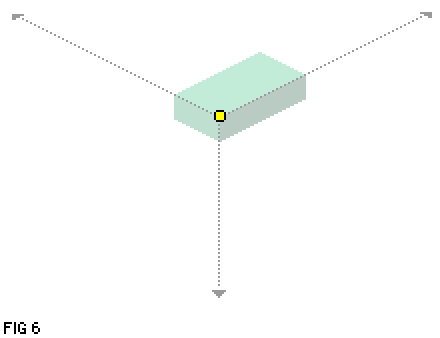
If the red block's selected vertex lies inside this area of 3D space behind the green block then it is deemed to be further back in the scene than the green block. If not, then it's in front of the green block. In this example iteration of the processing loop, the red block's vertex is outside of the region behind the green block and is therefore further forward in the scene.
Step Three
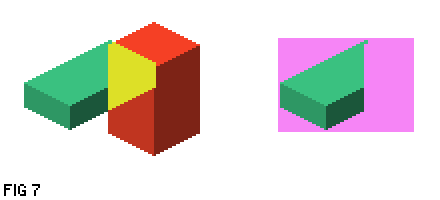
The final step is to punch a hole in the green block's sprite. This hole will be the same shape as the overlapping area of the red and green blocks. The overlapping area is illustrated in figure 7 as the yellow area, along with how the green sprite will look after the hole has been punched.
All three steps now need to be repeated so that the green block is processed against the blue block and the blue block is processed against the red block.
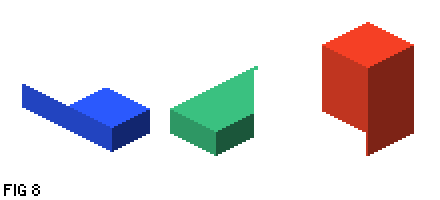
When the processing is finished, you will end with the three sprites shown in figure 8. All that's left to do is draw each sprite to the screen in any order you like.
This technique of masking the sprites will work on any number of objects in the scene. It goes without saying that more objects in the scene, the longer it will take to process, so the performance of your game will be dependant on several aspects. They are primarily:
- As mentioned, the number of objects in the scene
- The programming language you are using, and therefore the speed of your code
- Using pixel shaders to process the images will drastically improve performance
- The speed of your machine
The rendering engine for my isometric game Melkhior's Mansion uses pixel shaders to implement the technique described here. It also heavily optimises the rendering to avoid masking objects that always appear in the background. Those background objects are masked once when the scene is first rendered (ie. the player changes room) and then baked on to a background layer bitmap.